

How To Add Loading Animation Between Pages Css
Are you building a one page parallax scrolling website and getting concerned about your page load time?
Lets be honest, the 1 page websites tin become quite bulky very quickly even when yous optimize everything.
Y'all might be also interested in How To Brand Page Transitions in HTML – Barba.js and GSAP3 Tutorial
Related Screencast
One pick to reduce the frustration of your users is to add a squeamish custom preloader screen.
In this tutorial we will add together a CSS3 transitions to our already created CSS3 preloader.
In one case the content of the page is loaded, we'll animate the preloading screen abroad from the viewport with a nice transition.
What y'all volition learn
- how to use
CSS3 transitions - how to
animate outa total-screen preloader - how to combine
CSS3withJavaScriptfor this technique
Open the starting files and follow the steps beneath.
ane. Add HTML and CSS for loading overlay

In our alphabetize.html is an existing CSS3 preloader #loader on a white background, simply nosotros want to create a high dissimilarity between preload screen and the content.
Lets add two parts of the preloading screen inside of #loader-wrapper.
<div id="loader-wrapper"> <div id="loader"></div> <div class="loader-section department-left"></div> <div course="loader-section section-right"></div> </div>
Now nosotros'll add together some CSS into the css/principal.css, just after the @keyframes spin proclamation.
#loader-wrapper .loader-section { position: fixed; acme: 0; width: 51%; tiptop: 100%; background: #222222; z-index: thou; } #loader-wrapper .loader-department.section-left { left: 0; } #loader-wrapper .loader-section.section-right { right: 0; } This creates a full screen dark overlay, but unfortunately it too covers our rotating #loader and makes the page title hard to read.
CSS Tweaks
We volition need to tweak the z-alphabetize of #loader to bring it above our nighttime overlay and alter the color of our heading to light grey.
Find #loader in the stylesheet (line 43) and add the following mode, also include the h1 style just below our default p styles (line 34).
#loader { z-index: 1001; /* anything higher than z-index: 1000 of .loader-department */ } h1 { colour: #EEEEEE; } Cool, this is looking much improve.
2. Add and style our default content
Now lets add together some default content to the page so we take something to reveal.
Include a new div #content just below the closing #loader-wrapper tag.
HTML
<div id="content"> <h2>This is our page title</h2> <p>Lorem ipsum dolor sit amet.</p> </div>
Equally you lot can run across this content is hidden behind our preloader screen so lets annotate out the #loader-wrapper .loader-section for a while and style our content.
Add together the following into the master.css.
#content { margin: 0 auto; padding-lesser: 50px; width: 80%; max-width: 978px; } We are but centering our content container and setting a width and padding-bottom.
And now to the fun part of animating the two preloading screen sections out of the view.
3. Add together preloader transition
We will motion both parts out of the view using CSS3 transforms. When the trunk gets a class .loaded.
Add the post-obit code to chief.css.
/* Loaded */ .loaded #loader-wrapper .loader-section.department-left { -webkit-transform: translateX(-100%); /* Chrome, Opera fifteen+, Safari iii.1+ */ -ms-transform: translateX(-100%); /* IE 9 */ transform: translateX(-100%); /* Firefox 16+, IE 10+, Opera */ } .loaded #loader-wrapper .loader-department.section-right { -webkit-transform: translateX(100%); /* Chrome, Opera fifteen+, Safari 3.1+ */ -ms-transform: translateX(100%); /* IE 9 */ transform: translateX(100%); /* Firefox 16+, IE 10+, Opera */ } Nosotros'll too fade the preloader out at the aforementioned time, lets add this to our stylesheet.
.loaded #loader { opacity: 0; } Changing the #loader opacity to 0 seems to be working but that will brand our #content non accessible, considering the #loader container is withal sitting on top of our content.
We demand to add visibility: hidden; to #loader-wrapper.
.loaded #loader-wrapper { visibility: hidden; } To preview our styles we volition need to manually add together the .loaded class to the body chemical element.
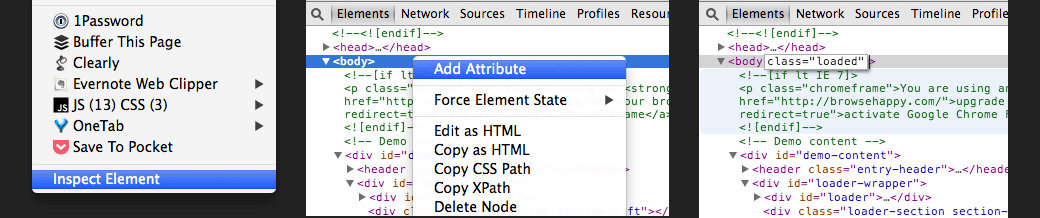
In Google Chrome right click anywhere on the page and click on audit element, this volition bring up the developer tools.
Right click on the body chemical element and add a new attribute class="loaded".
Hit enter and you'll run into our preloader screen disappear.
Great, merely hang on, where are the promised CSS3 transitions?
Lets exercise them in the next step.
4. Order of the animations
Firstly lets get the theory of our transition right.
The club of our animations should exist:
- fade
#preloaderout - animate both left and right side of the overlay out of the view
- animate the whole
#loader-wrapperout of the view
We will fade out the preloader starting time, by adding CSS3 transitions to #loader.
Tip: yous tin get the necessary CSS3 code snippet with all the required vendor prefixes from css3please.com.
.loaded #loader { opacity: 0; -webkit-transition: all 0.3s ease-out; transition: all 0.3s ease-out; } Then we volition breathing both sides out of a view with a slight 0.3s delay.
.loaded #loader-wrapper .loader-section.section-right, .loaded #loader-wrapper .loader-department.department-left { -webkit-transition: all 0.3s 0.3s ease-out; transition: all 0.3s 0.3s ease-out; } The first 0.3s defines animation duration and the second 0.3s defines the animations delay.
And lastly we will animate the whole #loader-wrapper out of the view using transform: translateY(-100%).
.loaded #loader-wrapper { -webkit-transform: translateY(-100%); -ms-transform: translateY(-100%); transform: translateY(-100%); -webkit-transition: all 0.3s 0.6s ease-out; transition: all 0.3s 0.6s ease-out; } As you lot can see, here we are setting the delay to 0.6s which is the total duration of our first two animations (0.three + 0.iii = 0.six).
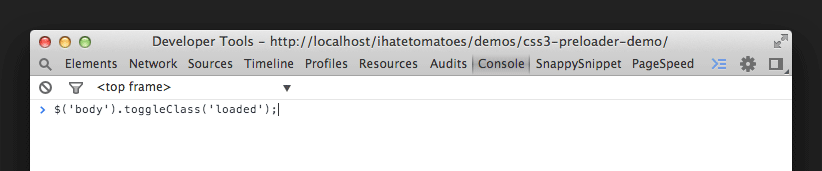
Another way to chop-chop preview the body class .loaded is to run this line of jQuery code in the web developer panel.
$('body').toggleClass('loaded'); This will toggle between our content and the preloader screen animating out.
Pretty cool, huh?
5. Fine tuning

To get even slicker animation for the left and right overlay we can change the easing from ease-out to cubic-bezier and conform the timing to 0.7s.
.loaded #loader-wrapper .loader-section.section-correct, .loaded #loader-wrapper .loader-section.section-left { -webkit-transition: all 0.7s 0.3s cubic-bezier(0.645, 0.045, 0.355, i.000); transition: all 0.7s 0.3s cubic-bezier(0.645, 0.045, 0.355, 1.000); } Irresolute the duration of left and right section transition also means that nosotros have to adjust the delay on .loaded #loader-wrapper animation to 1s.
.loaded #loader-wrapper { -webkit-transform: translateY(-100%); -ms-transform: translateY(-100%); transform: translateY(-100%); -webkit-transition: all 0.3s 1s ease-out; transition: all 0.3s 1s ease-out; } half-dozen. Fake information technology till you make it
Considering we don't have plenty "heavy" content on our page, nosotros will be faking the loading of the content with a elementary jQuery.
You tin use imagesloaded by David DeSandro or PxLoader past Pixel Lab on your ain projects, but we will have to faux it this time.
Include this code snippet in the js/main.js.
$(document).ready(part() { setTimeout(function(){ $('trunk').addClass('loaded'); $('h1').css('color','#222222'); }, 3000); }); That will set the body class to .loaded later on 3 seconds and also change the color of our h1 to dark grey.
If you want to acquire how to implement imagesLoaded into your projection, bank check out the Uncomplicated One Folio Template With A Preloading Screen tutorial.
7. No JavaScript, no worries
To ensure that our content is still accessible even without JavaScript being turned on, we can also include the .no-js fallback.
.no-js #loader-wrapper { display: none; } .no-js h1 { colour: #222222; } And that's information technology, y'all've made information technology!
You've created a nice blithe preloading screen using CSS3 animations and transitions.
Well done!
Determination
What practise you call up well-nigh this simple preloading transition?
Take you lot seen a cool preloading animation sequence on other sites? Let me know in the comments.
Other preloading tutorials
- A Simple One Page Template With A Preloading Screen
- How To Brand Page Transitions in HTML – Barba.js and GSAP3 Tutorial
Source: https://ihatetomatoes.net/create-custom-preloading-screen/
Posted by: jacksonhatur1943.blogspot.com
0 Response to "How To Add Loading Animation Between Pages Css"
Post a Comment